Today I updated my Cisco UCS system from 1.4(3q) to UCS 2.0(1m). I’m happy to say it was an easy process. First lets talk about why you want to do it, then lets talk about how to do it :
Why upgrade to 2.0?
- Disjoint Layer 2 network support
- iSCSI boot support with service profiles
- RedHat KVM support for VM-FEX
- Configuratble pre-login banner (for GUI and CLI)
- Support for vSphere 5 including auto-deployment with stateless computing, VMDirectPath with vMotion
- HDD operability indication without host agents.
Sound like something you want? Yes? Ok, lets do it:
1. Get UCS 2.0 software
- UCS Infrastructure Software Bundle. Click to download.(ucs-k9-bundle-infra.2.0.1m.A.bin)
- UCS B-Series Server Software Bundle for UCS Manager. Click to download.(ucs-k9-bundle-b-series.2.0.1m.B.bin)
- UCS C-Series Server Software Bundle for UCS Manager. Click to download.(ucs-k9-bundle-c-series.2.0.1m.C.bin) (only get this if you have rack mounts)
Most likely you’ll only need the first 2 packages. One for the infr
2. Get the UCS software update guide
You get this here. There’s lots of versions to upgrade from. Yours is there, trust me, cause we’re thinking of you first. From the update guide you can update the firmware in a cluster configuration without any disruption of the network. The blades will need to be rebooted for firmware updates to take place, but you probably knew that.
From 1.4 to 2.0 the order is shown as follows:
- Disable Call home
- Adapters (Activate / ignore compatibility / set startup only)
- CIMC (Activate / ignore compatibility)
- IOMs (Activate / ignore compatibility / set startup only, don’t reboot)
- UCS Manager!
- FI subordinate (Activate / ignore compatibility)
- Verify step 4 is done, that IOMs connected to FI subordinate have been updated, traffic is passing through
- FI primary (Activate / ignore compatibility)
- Update Host firmware for servers
- Reenable call home
That’s how I plan to do it. Lets see how it all turns out.
3. Upload Firmware to UCS Manager
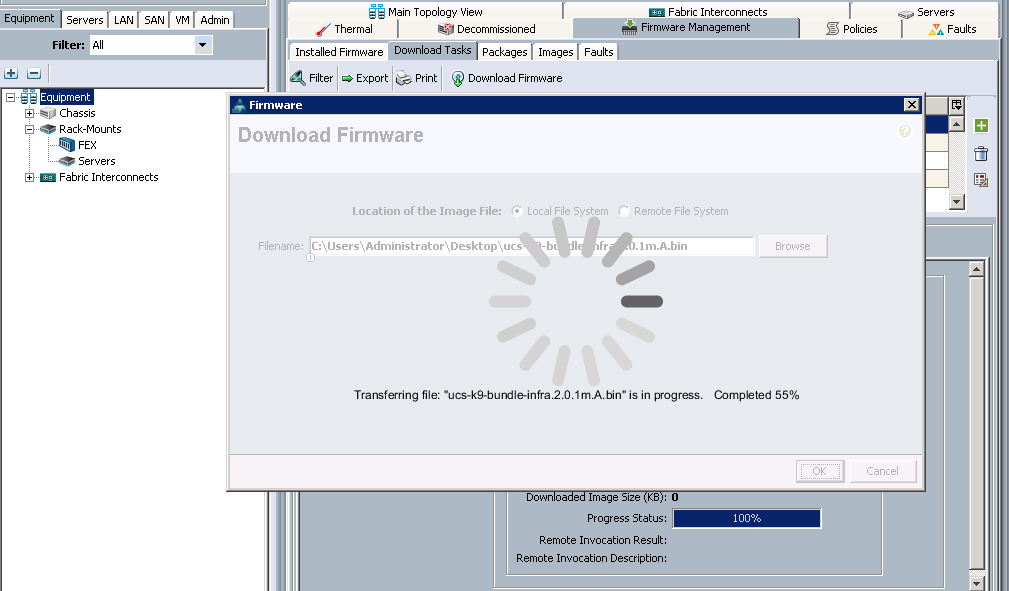
From the Equipment Tab select Equipment. Then on the right go to the Firmware Management Tab, then click Download Firmware.
In our case we did it for the two packages. The Infrastructure bundle and the Server bundle. I also used this time to get rid of some of the older firmware bundles. I kept the one that we had been using and deleted all the other ones. I like my UCS Firmware image list clean.
4. Update CIMCs
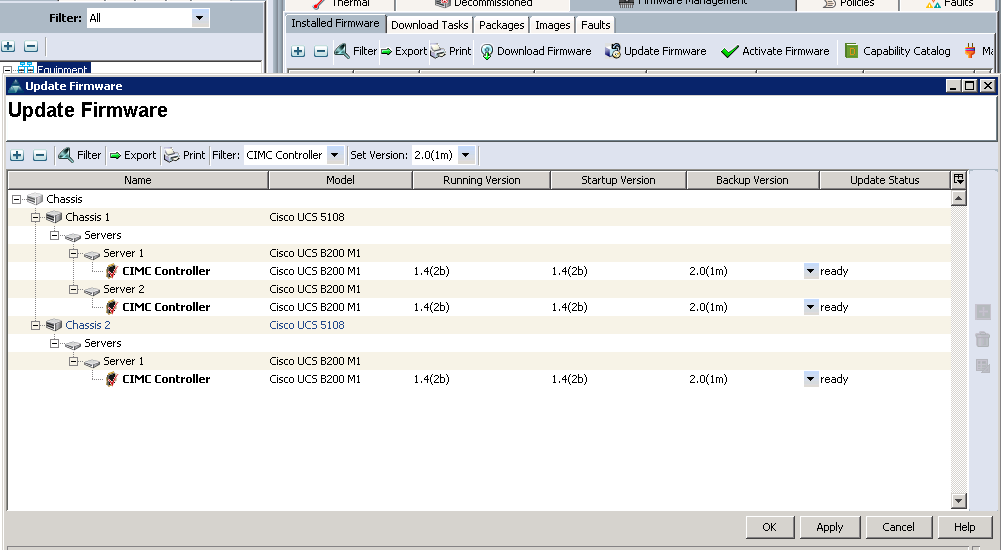
Choose Update Firmware from the Firmware Management Tab. Select CIMC from the top and then select 2.0 then set apply.
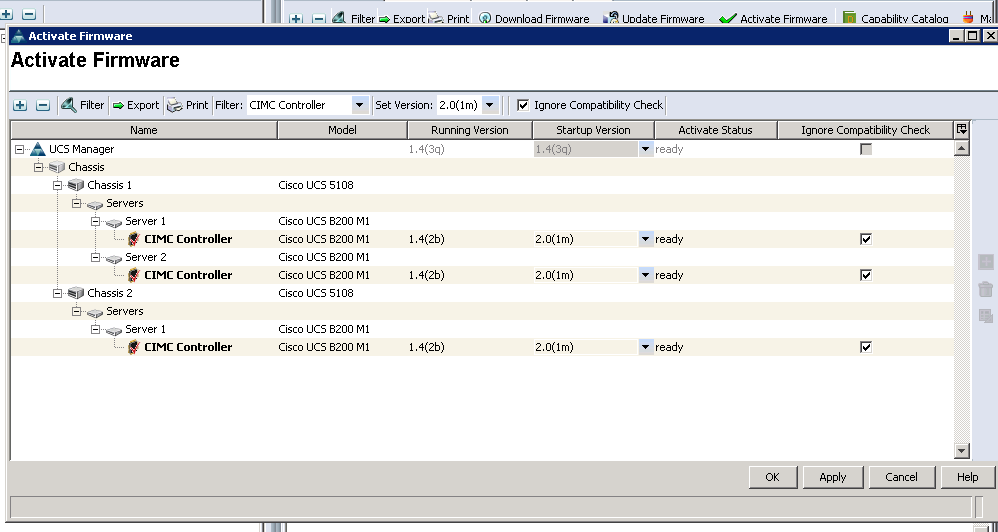
From here go to the Activate button, filter CIMCs and then update all of them to 2.0 checking the ignore compatibility button.
Stay on this screen for a while and you’ll see the CIMCs apply the update, then reboot and eventually show the running version equal to 2.0(1m) and show ready.
5. Update IOMs – Set as Backup, don’t activate
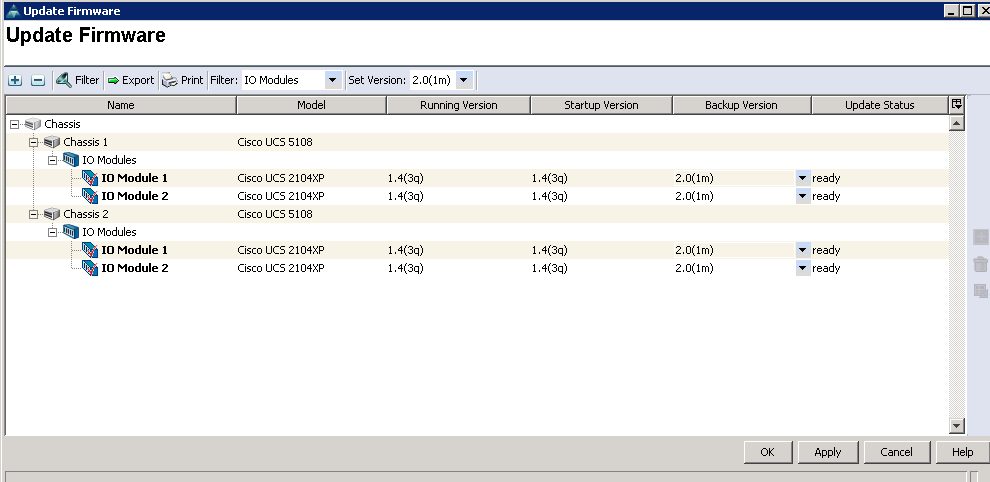
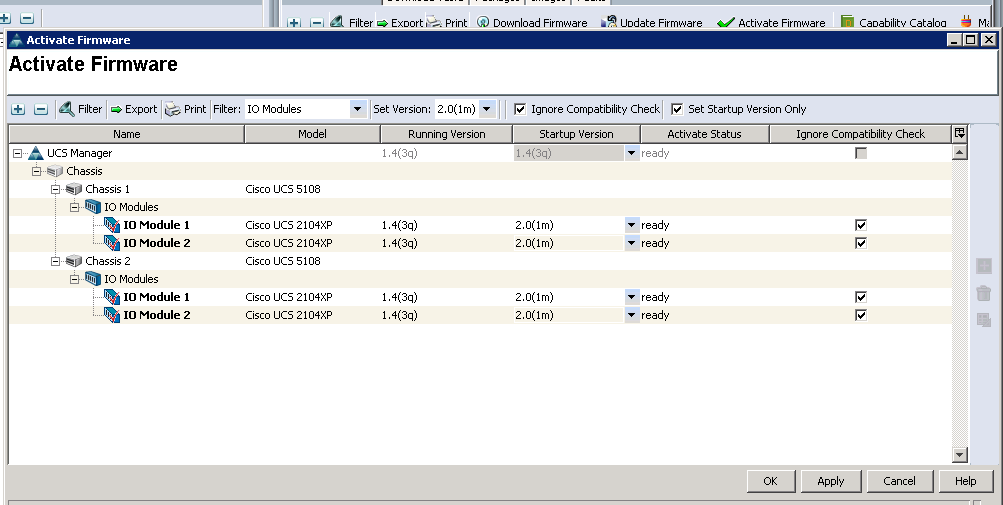
Go to the Update Firmware menu again, filter with IO Modules, then select 2.0.
Going to the Activate button, now set Activate, Ignore Compatibility Check, and Set Startup version only. This will make it so they only reboot when the Fabric Interconnect reboots. Thus saving you a few reboots.
6. Update UCSM!
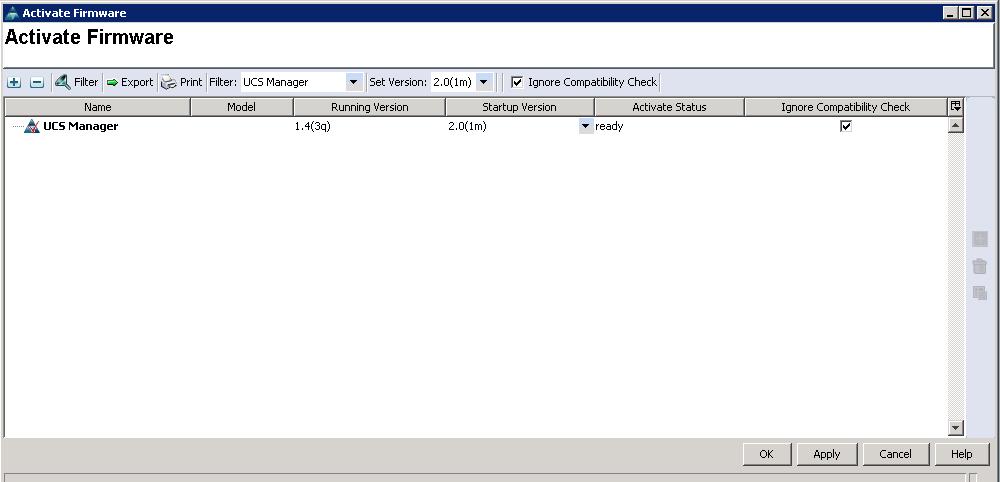
Can’t wait to see this part! Go to Activate. Hit apply. In a minute or two you’ll be disconnected.
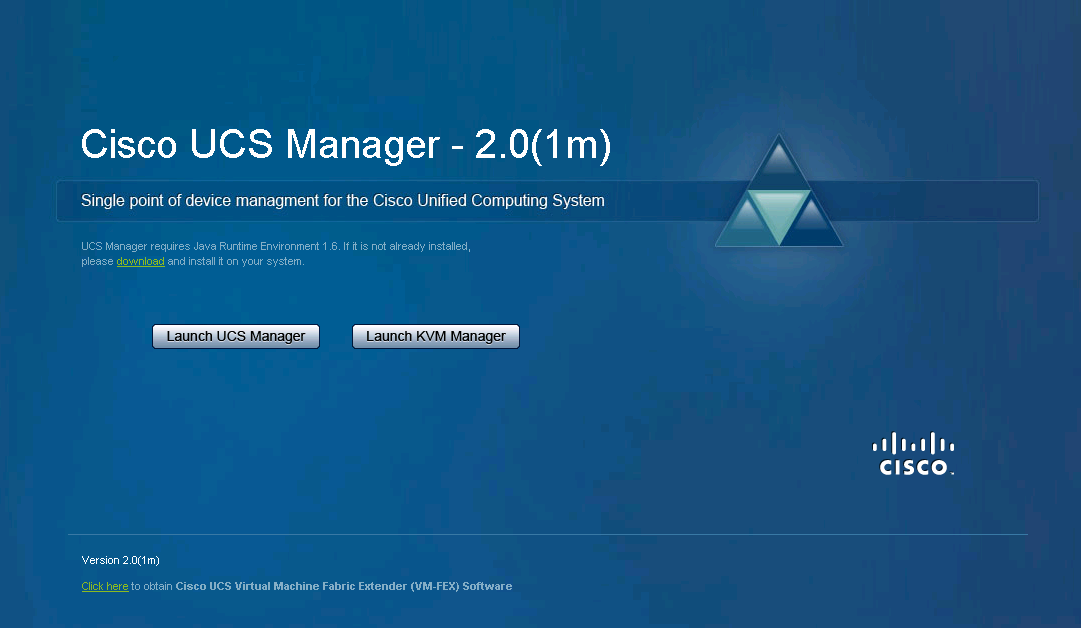
About 1 minute after that open your web browser to the screen and behold UCSM 2.0!
Yes, that just happened to you! Lets log in. And we’re back. Things look mostly the same, but you’ll see a new icon here and there that show the new features. For example in the VM tab you’ll see the cluster icon for KVM VM-FEX. Under the LAN tab you’ll see iSCSI Initiator Pools. Let’s move along and finish updating.
7. Update Fabric Interconnects
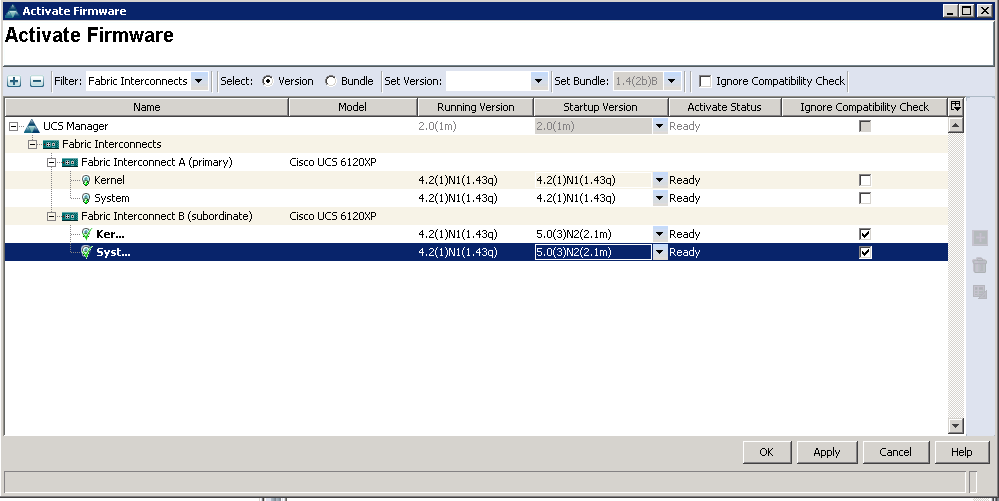
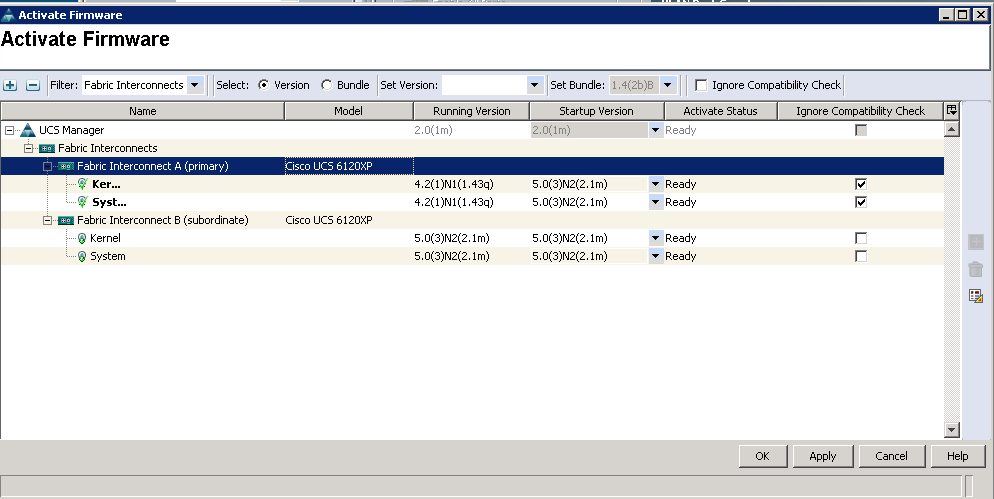
Same place we were before: Equipment table, Firmware management tab, and Activate firmware. Filter for Fabric Interconnect and this time, set the start up version of the subordinate fabric interconnect. Ignore compatibility and then hit ‘Apply’. You’ll get a message that you will be logged out, but if you are doing this to just the subordinate, then nothing to worry about here.
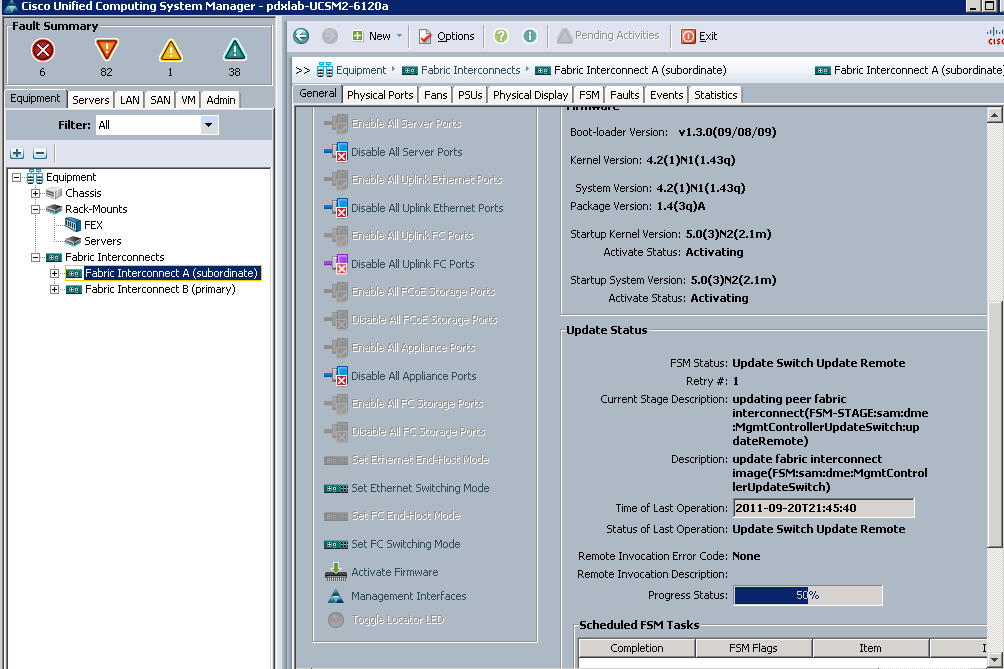
You can remain on that screen as the kernel and system firmware updates take place. No big deal. This one took about 12 minutes before it updated in the view. What’s going on in the background? Well, the FI is downloading the new firmware, then applying, then rebooting. You can watch the Finite State Machine (FSM) in the Fabric Interconnect table too as you go.
Once you are back up, then its time to update the primary fabric interconnect. Nothing strange here. Same thing. If you’re still on the same screen, just repeat those steps:
In a few minutes, you’ll be disconnected from UCS and Fabric Interconnect B will take over the UCS manager. You can still log back into the same address. Then you can see where you are in the state of things:
In a few minutes, that will be updated and all will be well with your UCS chassis. You may notice that FI-B becomes the primary and FI-A becomes the subordinate. If that bugs you, change A back to be the primary.
There’s only one step left to go!
8. Update the Blades
You may not want this to happen all at once. What I recommend is doing this at a Service Profile Template level. Set the soul of the server to be the firmware level you want. Then as new blades are added, they’ll always get this level.
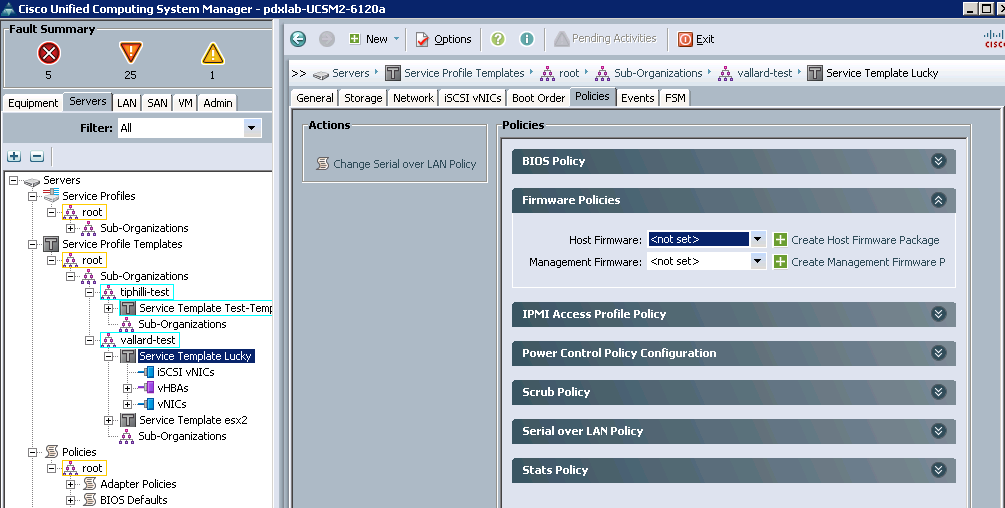
At the server tab, you’ll see the service profile templates tab where you created your service profile templates. Click on the Policies tab and create a new firmware policy for nodes in this group.
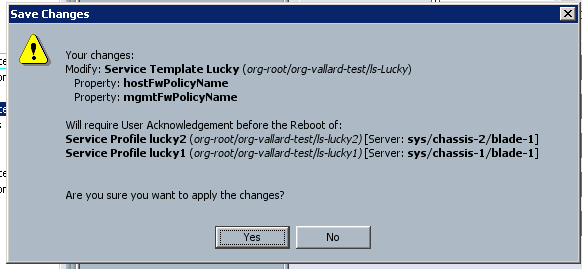
I just named mine 2.0.1m and clicked all the applicable fields for my hardware. I made one for the host firmware and the management firmware. Then I set them to my policy. Upon saving I get a nice message:
Since my policy is set to ‘user acknowledge’. The blades won’t reboot immediately, but instead I’ll get a nice blinking ‘Pending Activities’ notification. You may want to make sure this policy is set before saving. This can be done by going to the general tab under the service profile and selecting ‘Change Maintenance Policy’. Since I live dangerously, I reboot my live VMware cluster but I do half of the servers at once. This way, the VMs migrate. You can watch it in vCenter. Very fun. Then when those nodes are back up and integrated into vCenter, we reboot the other half of machines.
That’s all folks!
That was painless and easy. If you did that on any other legacy blade platform, or legacy rack mount it would take you hours. Keep in mind with legacy systems for each chassis you need to update
- the network switches
- the onboard administrator
- Each blade in the chassis individually including: IPMI interface, NIC, BIOS, Raid Controller, and Disk Drives.
This took 1 hour and all I did was click buttons, take screen shots, and write things down. No waiting for machines to reboot and hitting F2 at the right moment. Everything only rebooted once and it was easily orchestrated. I don’t have to guess if things were done correctly because I can look at my single pane of glass on UCSM and see that everything is updated.
Doing things the UCS way scales big time. While we only did 4 blades here, it would have taken the same amount of time to do 12o servers. No additional infrastructure was required to do it.
Doing things the old way in a legacy blade environment is like writing assembly code. As an undergraduate, we had to write a stack calculator using the MIPS instruction set in CS61c. It took hours and about 15 instructions to do one thing. UCS is like a higher level programming language for your data center. You do things quicker, and more efficiently. Even today compilers can make high level programming languages more efficient than you probably can doing it in assembly. And when there are so many other cool things like VMs, clouds, self service catalogs, etc… why waste time writing assembly language?
Comments are closed.