One of the issues skeptical Server Administrators have with the 1000v is that they don’t like the management interface being subject to a virtual machine. Even though the 1000v can be configured so that if the VSM gets disconnected/powered-off/blownup the system ports can still be forwarded. But that is voodoo. Most say: Give me a simple access port so I can do my business.
I’m totally on board with this level of thinking. After all, we don’t want any Jr. Woodchuck network engineer to be taking down our virtual management layer. So let’s keep it simple.
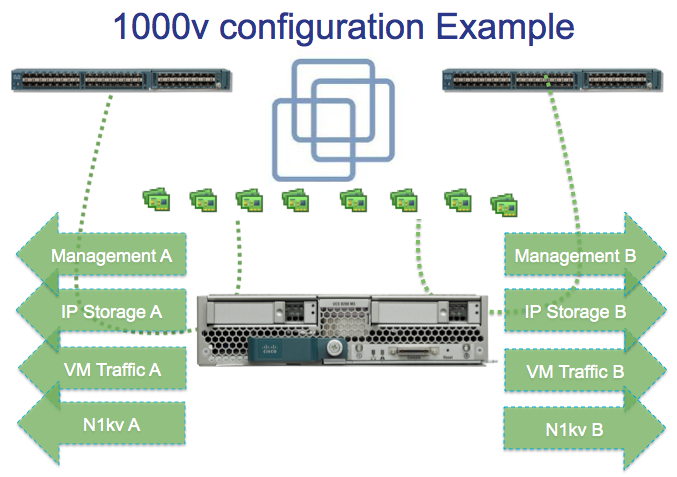
In fact! You may not want Jr. Woodchuck Networking engineer to be able to touch your production VLANs for your production VMs. Well, here’s a solution for you: You don’t want to do the networking, but you don’t want the networking guy to do the networking either. So how can we make things right? Why not just ease into it. The diagram below, presents, the NIC level of how you can configure your ESXi hosts:
Here, is what is so great about this configuration. The VMware administrator can use things “business as usual” with the first 6 NICs.
Management A/B teams up with vmknic0 with IP address 192.168.40.101. This is the management interface and used to talk to vCenter. This is not controlled by the Nexus 1000v. Business as usual here.
IP Storage A/B teams up with vmknic1 with IP address 192.168.30.101. This is to communicate with storage devices (NFS, iSCSI). Not controlled by Nexus 1000v. Business as usual.
VM Traffic A/B team up. This is a trunking interface and all kinds of VLANs pass through here. This is controlled either by a virtual standard switch or using VMware’s distributed Virtual Switch. Business as usual. You as the VMware administrator don’t have to worry about anything a Jr. Woodchuck Nexus 1000v administrator might do.

Now, here’s where its all good. With UCS you can create another vmknic2 with IP address 192.168.10.101. This is our link that is managed by the Nexus 1000v. In UCS we would configure this as a trunk port with all kinds of VLANs enabled over it. This can use the same VNIC Template that the standard VM-A and VM-B used. Same VLANs, etc.
(Aside: Some people would be more comfortable with 8 vNICs, Then you can do vMotion over its own native VMware interface. In my lab this is 192.168.20.101)
The difference is that this IP address 192.168.10.101 belongs on our Control & Packet VLAN. This is a back end network that the VSM will communicate with the VEM over. Now, the only VM kernel interface that we need to have controlled by the Nexus 1000v is the 192.168.10.101 IP address. And this is isolated from the rest of the virtualization stack. So if we want to move a machine over to the other virtual switch, we can do that with little problem. A simple edit of the VMs configuration can change it back.
Now, the testing can coexist on a production environment because the VMs that are being tested are running over the 1000v. Now you can install the VSG, DCNM, the ASA 1000v, and all that good vPath stuff, and test it out.
From the 1000v, I created a port profile called “uplink” that I assign to these two interfaces:
port-profile type ethernet uplink
vmware port-group
switchport mode trunk
switchport trunk allowed vlan 1,501-512
channel-group auto mode on mac-pinning
no shutdown
system vlan 505
state enabled
By making it a system VLAN, I make it so that this control/packet VLAN stays up. For the vmknic (192.168.10.101) I also created a port profile for control:
port-profile type vethernet L3-control
capability l3control
vmware port-group
switchport mode access
switchport access vlan 505
no shutdown
system vlan 505
state enabled
This allows me to migrate the vmknic over from being managed by VMware to being managed by the Nexus 1000v. My VSM has an IP address on the same subnet as vCenter (even though its layer 3)
n1kv221# sh interface mgmt 0 brief
——————————————————————————–
Port VRF Status IP Address Speed MTU
——————————————————————————–
mgmt0 — up 192.168.40.31 1000 1500
Interestingly enough, when I do the sh module vem command, it shows up with the management interface:
Mod Server-IP Server-UUID Server-Name
— ————— ———————————— ——————–
3 192.168.40.102 00000000-0000-0000-cafe-00000000000e 192.168.40.102
4 192.168.40.101 00000000-0000-0000-cafe-00000000000f 192.168.40.101
On the VMware side, too, it shows up with the management interface: 192.168.40.101
Even though I only migrated the 192.168.10.101 vmknic over.
This configuration works great. It provides a nice opportunity for the networking team to get with it and start taking back control of the access layer. And it provides the VMware/Server team a clear path to move VMs back to a network they’re more familiar with if they are not yet comfortable with the 1000v.
Let me know what you think about this set up.


Comments are closed.